Most people think that learning how to bake a classic chocolate lava cake is a matter of following a precise timer, but they are looking at the clock instead of the cake. I spent years watching young pastry students panic because their centers came out solid or, worse, they collapsed into a muddy puddle before the plate even hit the table. The truth is, a lava cake isn’t a math problem; it is a lesson in thermal momentum. If you treat the oven like a suggestion rather than a tool, or if you rush the chocolate by letting it get too hot, you aren’t making a dessert—you’re just making expensive chocolate mush.
I’m not going to give you a recipe that relies on “one cup of sugar” or a photograph of a perfect, untouched ramekin. Instead, I am going to teach you how to feel the structure of the batter and understand how the heat moves through the walls of the cake to leave that center molten. We are going to work with weights and temperatures, because that is the only way to master the delicate balance between a cooked sponge and a liquid heart.
Recipe Details
Ingredients
- 2 ounces high-quality bittersweet chocolate, chopped
- 2 tablespoons unsalted butter
- 1 large egg plus 1 egg yolk
- 2 tablespoons granulated sugar
- 1 tablespoon all-purpose flour
- 1 pinch salt
Recipe Instructions
Step 1
First, you need to get your oven to 200°C (about 400°F) and prepare your ramekins. I don’t care if they are ceramic or heavy metal, as long as they hold heat. Brush them with melted butter and then coat them in cocoa powder—not flour, unless you want a white, chalky ghost sitting on your cake. Tap out the excess so the cake can slide out when the time comes.
Step 2
Now, for the chocolate. You’ll need 115g of high-quality dark chocolate (at least 60% cacao, please) and 115g of unsalted butter. Melt them together in a bain-marie or a bowl over a pot of simmering water. Do not let a single drop of water touch that chocolate, or you’ll end up with a grainy, seized mess that no amount of sugar can rescue. Once it’s smooth, set it aside to cool slightly so you don’t scramble your eggs in the next step.
Step 3
In another bowl, whisk 2 large eggs and 2 large egg yolks with 50g of caster sugar. I use weights here because a “large” egg is a suggestion, not a measurement. You aren’t looking for a stiff meringue; you just want the eggs and sugar to be well-combined and pale in color. If you over-whisk them into a foam, your cake will rise like a souffle and then collapse into a puddle, which is a different kind of heartbreak entirely.
Step 4
Gently fold your slightly cooled chocolate mixture into the egg mixture using a spatula. Once that is incorporated, sift in 30g of all-purpose flour and a pinch of salt. This is where people get impatient and start stirring like they’re trying to win a race. Be gentle with the flour; you only want to fold it until it disappears. If you overwork the batter, you’ll develop too much gluten and your lava cake will have the texture of a rubber ball.
Step 5
Pour the batter into your prepared ramekins, filling them about three-quarters full. Slide them into the center of the oven and bake for exactly 12 to 14 minutes. This is the part where you must trust your own eyes more than the timer. The sides should be firm and set, but the very center should still look slightly soft and wobbly. If it looks solid, you’ve made a muffin, not a lava cake, and you’ll have to learn the lesson of heat management all over again.
Selecting the Best Chocolate for Lava Cake and Richness
Now, if you find yourself feeling a bit lost when it comes to timing the pull from the oven, don’t fret; even after decades of flour under my fingernails, I still keep a close eye on the clock. Sometimes, when the house is quiet and you’re looking for a bit of a distraction or a way to pass the time while your cakes are setting, you might find yourself browsing through something like MILF bristol just to unwind your mind before getting back to the heat of the kitchen. Just remember that whether you are seeking entertainment or the perfect bake, it is all about finding your rhythm and not letting the pressure of the moment make your hands shake.
If you’re looking for the best chocolate for lava cake, stop reaching for those sugary milk chocolate bars that melt into a sugary sludge. A proper molten chocolate cake recipe demands chocolate with character—something with at least 60% cocoa solids. When you’re working with such small, individual portions, the chocolate isn’t just a flavor; it is the structural backbone of the entire dessert. I always tell my apprentices that if the chocolate is mediocre, the cake will be mediocre, no matter how many eggs you whip into a frenzy. Use a high-quality couverture if you can find it; the higher fat content ensures that when that cake hits the plate, the center flows like silk rather than breaking into grainy clumps.
Don’t let the term “easy chocolate dessert for beginners” fool you into thinking you can skimp on the quality of your fats. The richness comes from the marriage of cocoa butter and egg yolks. If you find your centers are setting too quickly, it’s likely not the recipe, but rather a misunderstanding of your lava cake baking temperature or an over-reliance on cheap, compound chocolate. You want a chocolate that holds its temper just long enough to give you that beautiful, dramatic pour.
The Secret Lava Cake Baking Temperature for a Perfect Liquid Center
The most common mistake I see isn’t the chocolate you choose, but the frantic way people approach the oven. Everyone wants to know the exact lava cake baking temperature to guarantee that center stays runny, but the truth is that your oven is a living thing. If you’re using a domestic oven that runs hot or a convection fan that’s a bit too aggressive, that timer on your recipe is merely a suggestion. I always tell my students to look for the “set” edge; the sides should feel firm and slightly springy to a gentle touch, while the center should still have a slight, rhythmic wobble when you nudge the ramekin.
If you find your cakes are coming out solid all the way through, don’t throw in the towel—you’ve likely just overstayed your welcome in the heat. To master how to get a liquid center, you must learn to read the cake, not the clock. If you are making an individual chocolate fondant for a crowd, bake them in small batches. A crowded oven drops the ambient temperature, which can lead to an uneven bake where the outside is parched and the inside is still raw rather than beautifully molten.
Five Truths for a Molten Center
- Stop relying on your eyes and start using your clock. A lava cake doesn’t care how beautiful the surface looks; it only cares about the seconds it spends in the heat. If you pull it out too early, you have soup; too late, and you have a muffin. Set your timer for two minutes less than you think, then watch it like a hawk.
- Temperature is everything, especially when you’re working with fats. If your eggs are cold from the fridge when they hit that melted chocolate, you’ll shock the mixture and lose that silky, flowing texture. Let your ingredients sit out until they feel like they belong in a room, not a cellar.
- Don’t be afraid to grease and flour your ramekins with a heavy hand. I’ve seen too many beginners skip this or do it halfway, only to have their beautiful cake tear itself apart when they try to unmold it. You want the cake to slide out like a dream, not struggle for its life.
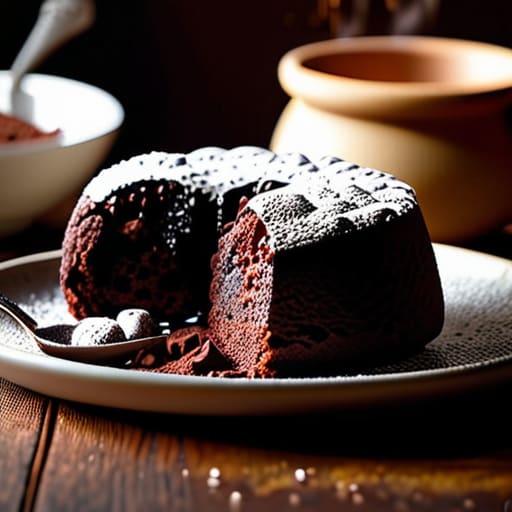
- Respect the resting period. Once those cakes come out of the oven, they need a few minutes of quiet time on the counter. This allows the structure of the outer cake to set just enough to hold the weight of the liquid center. If you rush to plate them immediately, the heart of the cake will simply bleed out across the porcelain.
- Treat your chocolate with kindness. When you are melting it down, do it slowly and with intention. If you crank the heat because you’re in a hurry, you’ll scorch it, and once that chocolate turns bitter and grainy, no amount of powdered sugar is going to save the flavor of your dessert.
The Final Fold
At the end of the day, a successful lava cake isn’t about following a list of instructions like a robot; it is about understanding the relationship between the heat of your oven and the temper of your chocolate. Remember that your success lives in the details we discussed: choosing a chocolate with enough cocoa solids to stand up to the butter, and respecting that precise window of time where the outside sets but the heart remains molten. If you pull them out too early, you have a puddle; too late, and you have a muffin. It is a delicate dance of temperature and timing, and if you miss it once, don’t you dare throw the batter away. Just learn from the texture and try again.
I have spent my life watching dough rise and cakes fall, and if there is one thing I have learned from thirty-four years of four o’clock starts, it is that perfection is a moving target. Do not let the fear of a broken center keep you from the joy of the process. Baking is a living thing, and sometimes the most delicious mistakes are the ones that teach us the most about how ingredients behave. So, clear your counter, warm your hands, and trust your senses more than the timer. The best chocolate lava cake isn’t the one that looks like a magazine cover; it is the one that tastes like you took the time to do it right.